Worker Uploader – UK
How to add workers in bulk using the Worker Uploader
When you need to add a large number of new workers to your organisation’s Workers list, the Worker Uploader process is the most efficient and time-saving method to use. This process follows the same requirements as the manual entry for a Worker Profile while allowing you to add multiple records using a single upload template file.
| This guide was created based on standard settings. Your organisation’s specific setup is based on your company’s configuration settings and/or data visibility rules and may vary slightly from what is described here. |
Step 1: Download the Workers template file.
-
Log in to JoinedUp (UK-based model).
-
Navigate to upload.
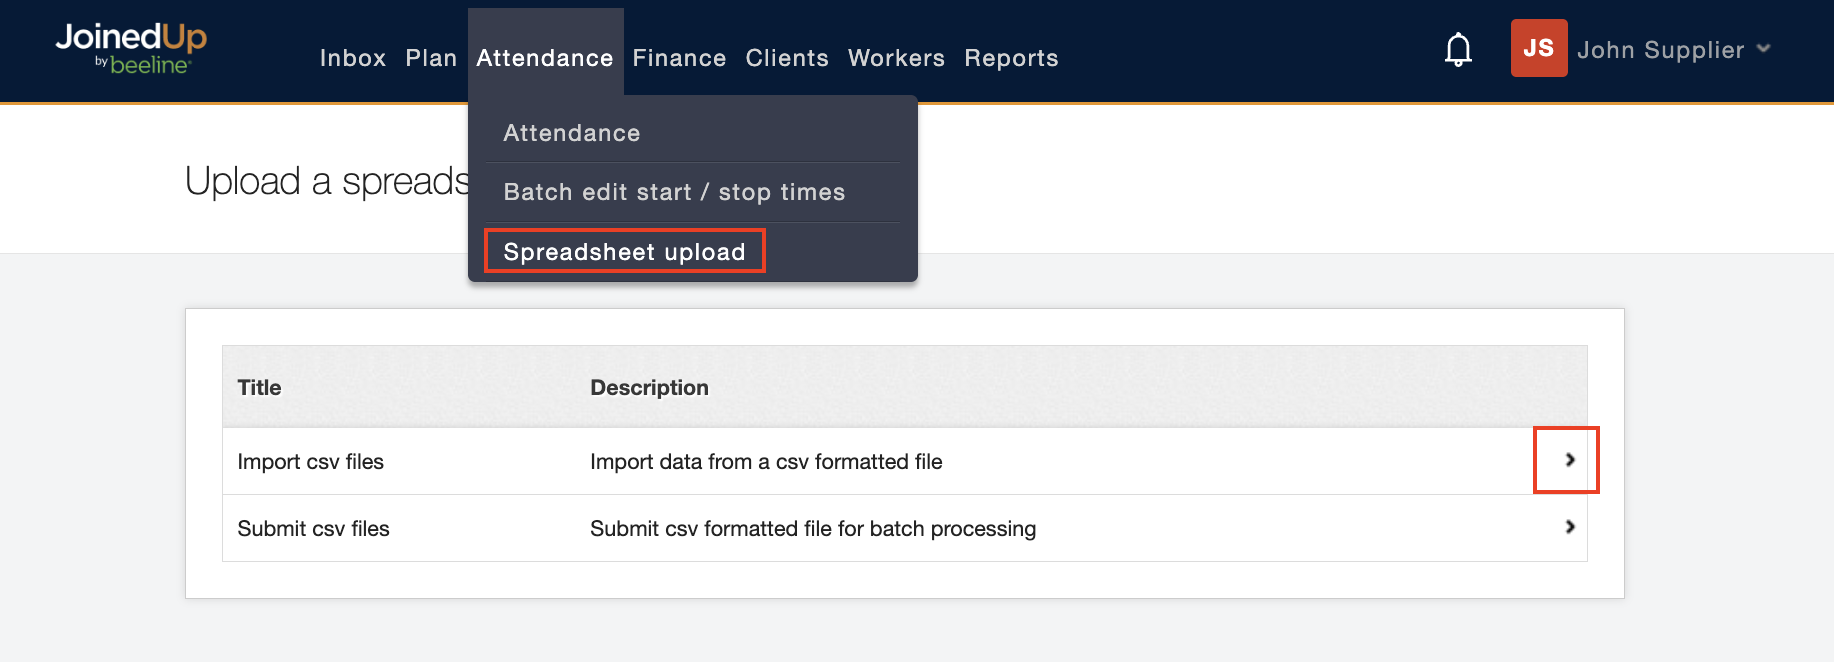
-
Click the expansion arrow to display the list of available template files. The screen refreshes to display the CSV import screen.
-
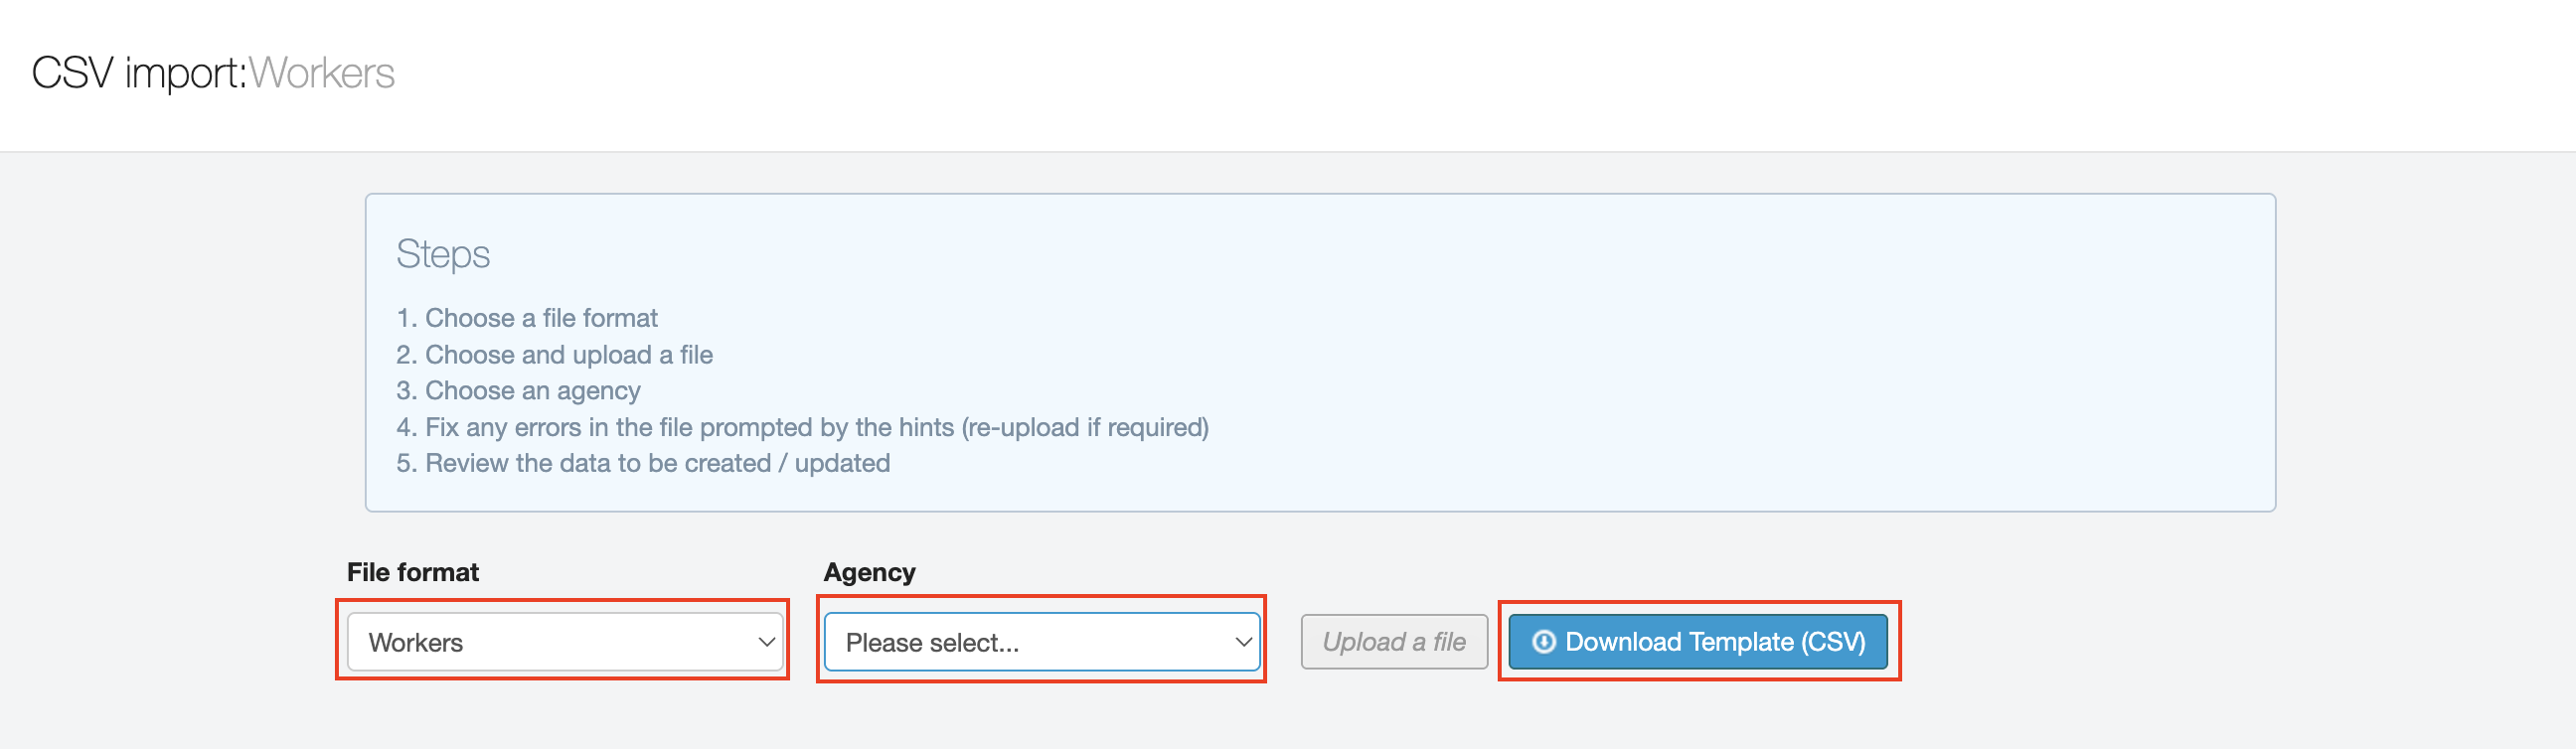
Select Workers in the File format selection list, then select the appropriate agency from the Agency list. NOTE: Workers may be pre-selected as the file format for some organisations and the only visible selection option will be Agency.
-
Click the Download Template (CSV) button to save the template file to your downloads folder.
Step 2: Populate the worker data into your Workers template file.
-
Navigate to your desktop Downloads folder and open the “worker_import_template.csv” file you downloaded in Step 1.
-
Starting with Column A (First Name), enter data in all MANDATORY columns and any other columns as designated by your agency. Each row should include all the necessary data for a single worker profile. The standard mandatory system data fields are listed in the table below along with their data entry format requirements.
There may be data fields other than the standard system mandatory fields that need to be entered to meet your organisation’s requirements, check with your Program Office. -
Once you have finished entering the necessary data, save your completed file in .csv format. Use the <Save as> option to save your completed Workers template CSV file using a naming format that easily identifies the file’s content. See the Tips & Best Practises section for additional guidance on working with data fields and upload files.
Mandatory fields and data entry formats:
|
ADJUSTMENTS TO THE TEMPLATE: NEVER change the arrangement of the columns, add or delete columns, or hide columns in the template. If it is not a mandatory field, and it is not a field that is relevant to your program, then leave it blank. The validation tool requires that ALL template fields be included in every import file and that the fields are arranged in the same order as the default template. |
| Field | Data entry | Type of field |
|---|---|---|
First name |
Standard English letters using mixed case format. Example: Amy, Arthur |
Mandatory |
Surname |
Standard English letters using mixed case format. Never include commas within the field. Example: Smith, Jr. should be entered as Smith Jr. |
Mandatory |
Payroll Reference Number |
Please enter the worker payroll reference number. |
Optional |
Date of birth |
Format should be standard UK, as in DD/MM/YYYY - if the year is unknown, enter 1990. |
Required to reach 100% completion rating on the Worker Profile. These fields can be completed by either the Agency or the Worker. |
Gender |
Enter one of the following options: MALE, FEMALE, or NOT_SET |
Required to reach 100% completion rating on the Worker Profile. These fields can be completed by either the Agency or the Worker. |
Mobile prefix |
Enter standard format. |
Required to reach 100% completion rating on the Worker Profile. These fields can be completed by either the Agency or the Worker. |
Mobile number |
Enter only the numbers, no parentheses or dashes. |
Required to reach 100% completion rating on the Worker Profile. These fields can be completed by either the Agency or the Worker. |
Enter a valid email address to which the worker has access. |
Mandatory |
|
Postcode |
Enter standard format. |
Required to reach 100% completion rating on the Worker Profile. These fields can be completed by either the Agency or the Worker. |
Address line 1 |
Standard English letters using mixed case format. Never include commas within the field. This should be the worker’s home address. |
Required to reach 100% completion rating on the Worker Profile. These fields can be completed by either the Agency or the Worker. |
Town / city |
Standard English letters using mixed case format. |
Required to reach 100% completion rating on the Worker Profile. These fields can be completed by either the Agency or the Worker. |
NI number |
Enter National Insurance number. Number must be unique or the validation will fail. |
Required to reach 100% completion rating on the Worker Profile. These fields can be completed by either the Agency or the Worker. |
Is driver role |
Y/N |
Mandatory |
Preferred site ID |
If you do not know the Site ID, instructions on how to locate it are provided in the Tips & Best Practises section at the end of this article. |
Mandatory |
Employment status |
Enter one of the following options: LTD_COMPANY, PAYE, UMBRELLA |
Mandatory |
Branch IDs |
If you do not know the Branch ID, instructions on how to locate it are provided in the Tips & Best Practises section. |
Recommended |
Template IDs |
If you do not know the Branch ID, instructions on how to locate it are provided in the Tips & Best Practises section. |
Recommended |
Enable email comms |
Y or N - enter Y to enable along with valid email in Email field. |
Mandatory |
Enable SMS comms |
Y or N - enter Y to enable and enter number in Mobile number field. |
Mandatory |
SAMPLE: UK Worker
Click the “SAMPLE” hyperlink below the image to view a Worker template that includes sample data.
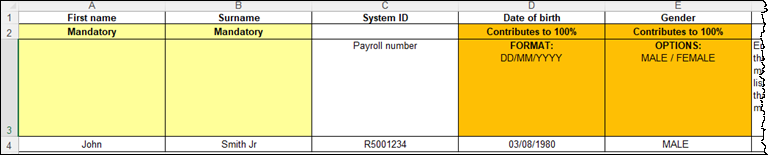
| This file is for demonstration purposes only. The format has been changed to xlsx in order to include the advisories/instructions in Rows 2-3. |
Step 3: Upload the Workers data file.
-
Navigate back to and click the expansion arrow to reveal the CSV import screen.
-
Make the same File format and Agency selections you entered when you downloaded the template file.

-
Click the Upload a file button and then use your desktop <browse> options to locate the CSV file you created and saved in Step 2.
-
Click the CSV filename to launch the upload and validation process. The screen refreshes to display the CSV import results details.
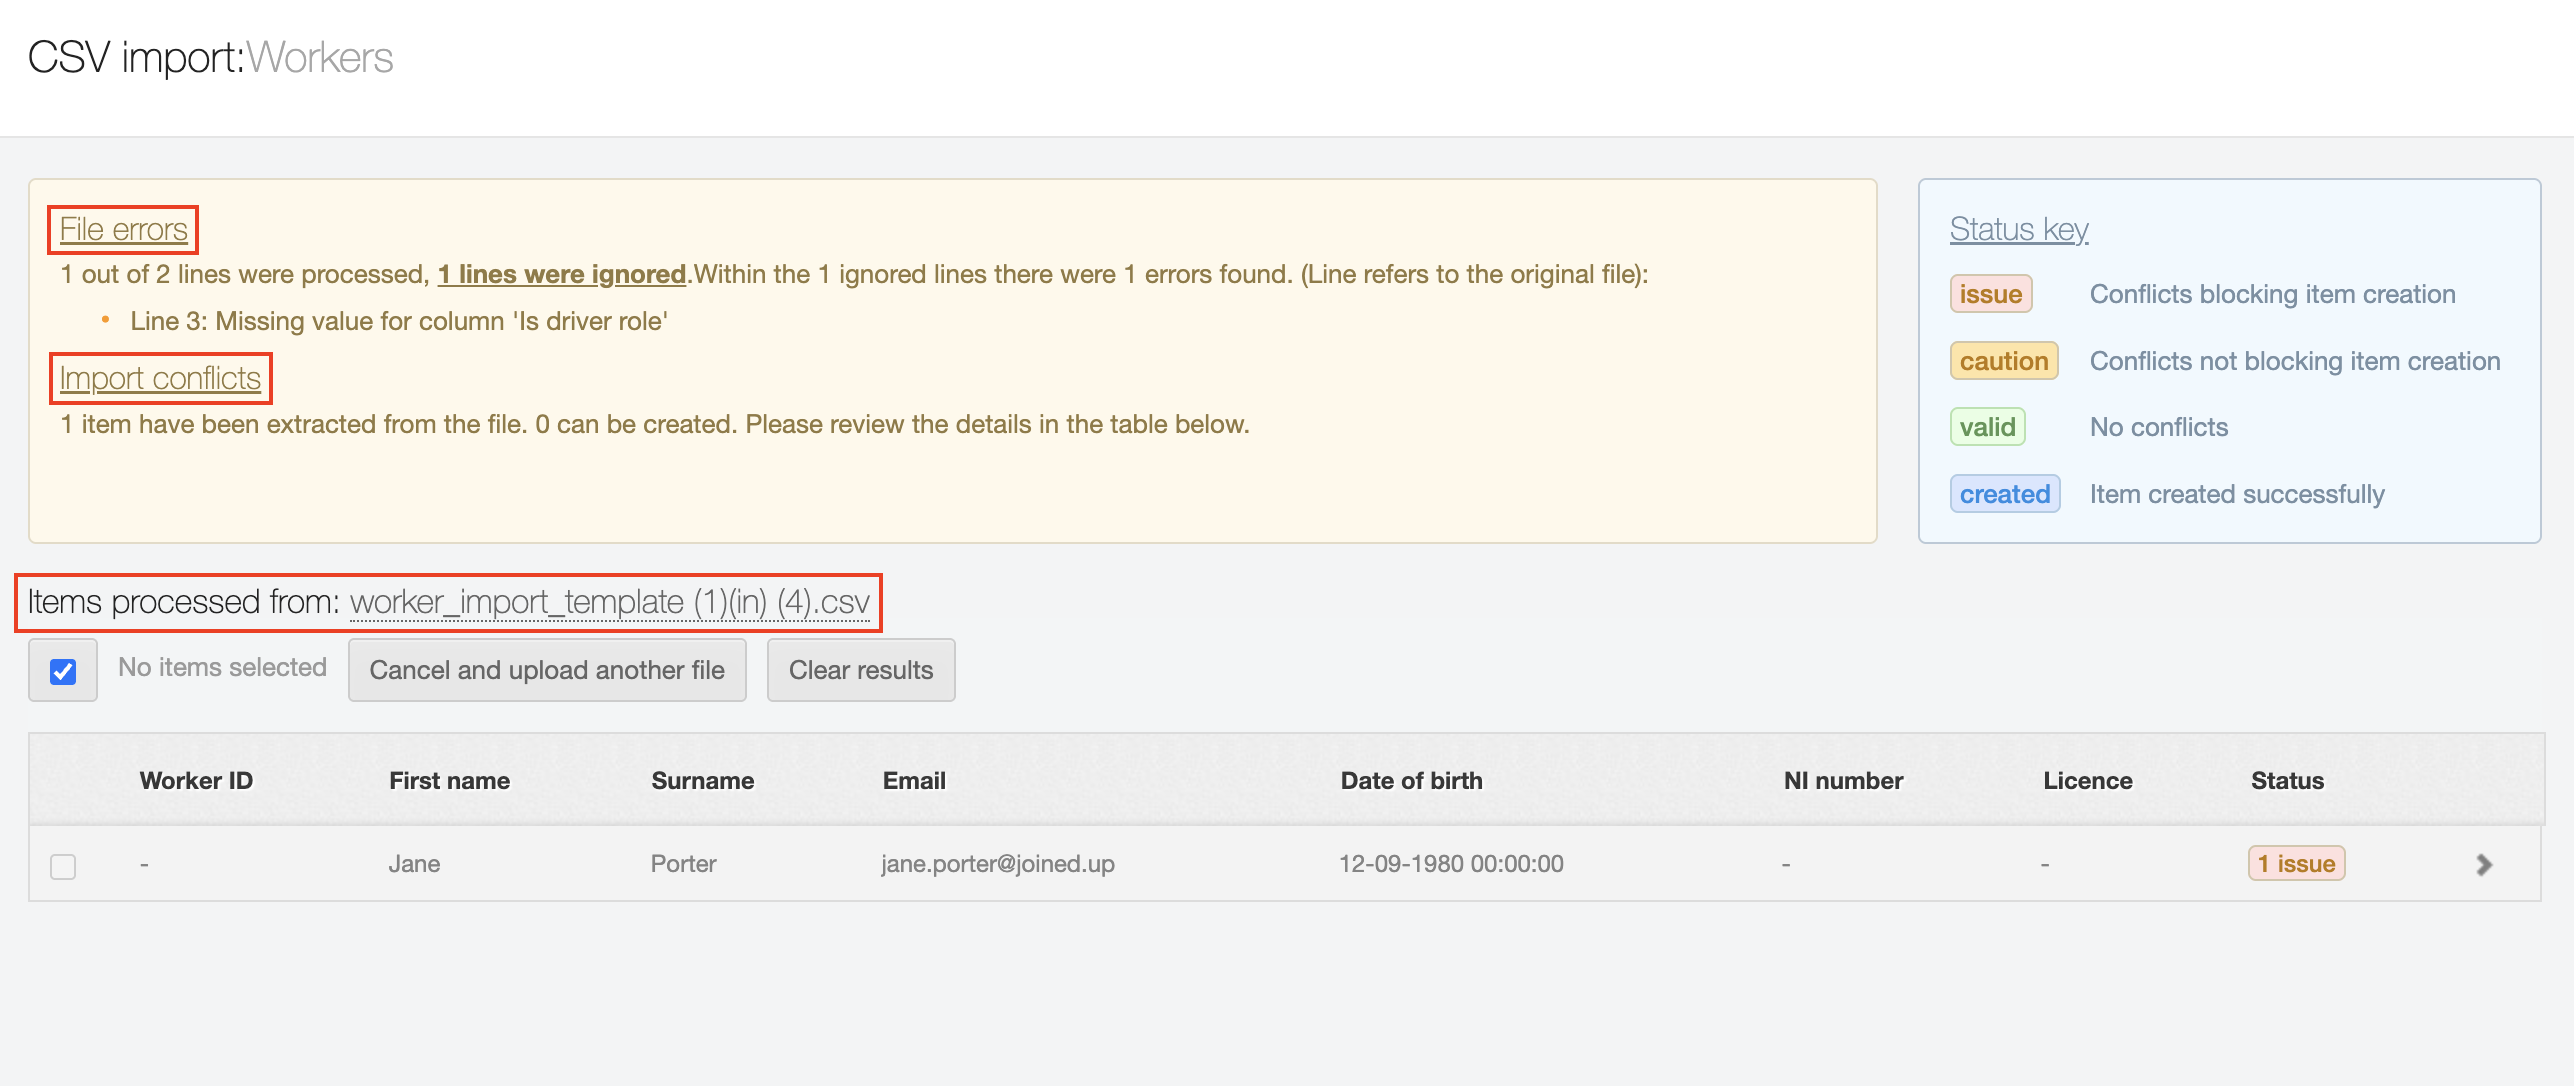
The Status key section displays on the upper right. Depending on the file validation results, records that fail to pass the validation process will display as File errors or Import conflicts in the respective section to the left of the Status key. Follow the prompts to resolve/correct/adjust the records as indicated.
The bottom section of the screen displays Items processed from [filename]. Review postings in the Status column and make adjustments as needed.
Tips & Best Practises
If you have manually created a Worker Profile record in JoinedUp, these data fields will be familiar to you. Be aware, however, that the autofill and pop-up selection lists features that are incorporated into the manual entry method are not available when entering data in a template file. Some data fields (for example name and address) are self-explanatory, but we’ve added a few tips and best practise recommendations below to make the upload process as easy as possible!
-
Changes to the template – As previously stated, NEVER change the arrangement of the columns, add or delete columns, or hide columns in a template. It will cause the validation to fail.
-
CSV format – CSV, “comma separated value” is a common format for upload/import files. The comma is used as a delimiter and it ‘tells’ the validation process to move to the next field (column) when uploading data, THEREFORE, no comma should ever be included within a data field, or it will cause the validation process that matches system data fields to template columns to “mismatch”—and the validation will fail. Surname fields are a primary culprit for this error, ignore any commas used in standard English usage and just enter the information. For example: Smith, Jr. should be entered as Smith Jr.
-
Upload files – As a “best practise”, you should store copies of all files you upload into your JoinedUp production instance in a location that is accessible to all agency staff who have upload rights. Agree on a file naming format that is logical for all users. Stored files can be used as an uploads archive as well as example files when creating new upload files in the future. However, take care to always download a new template rather than making a copy/paste version of a previous file. Changes can be made to templates at any time, and you want to ensure that you are ALWAYS using a template that reflects CURRENT data fields and settings.
-
Pop-up selection lists – several data fields (for example Nationality) have pop-up selection lists when you manually create a Worker Profile. The template validation process requires that you enter the very same spelling and text format (for example mixed case for Nationality) used in these selection lists for the data you enter into the template columns or the validation will error out.
-
Autofill – when you manually create a worker’s profile, you can enter the postcode for a worker’s address and the system will autofill the related address information. However, there is no autofill option with a template file and if postcode is designated as a mandatory field then all the associated fields that the system would have autofilled need to be completed as well.
-
NI Number – the entry for the National Insurance Number must be unique or the validation process will fail.
-
Worker permit fields – the Work permit type and Work permit expiry date fields must be entered manually—leave these fields blank or the upload validation will fail. Format for manual entry is as follows:
Work permit required: Y/N
Work permit type: Enter Accession Worker Card + Employer Work Permit (example, Non-EU Work Permit)
Work permit expiry date: Format is DD/MM/YYYY
-
Employment status – the three valid options for a UK worker are LTD_COMPANY, PAYE, UMBRELLA. Take care that you enter the correct status especially if your Program extracts files from JoinedUp to be used for invoicing purposes.
-
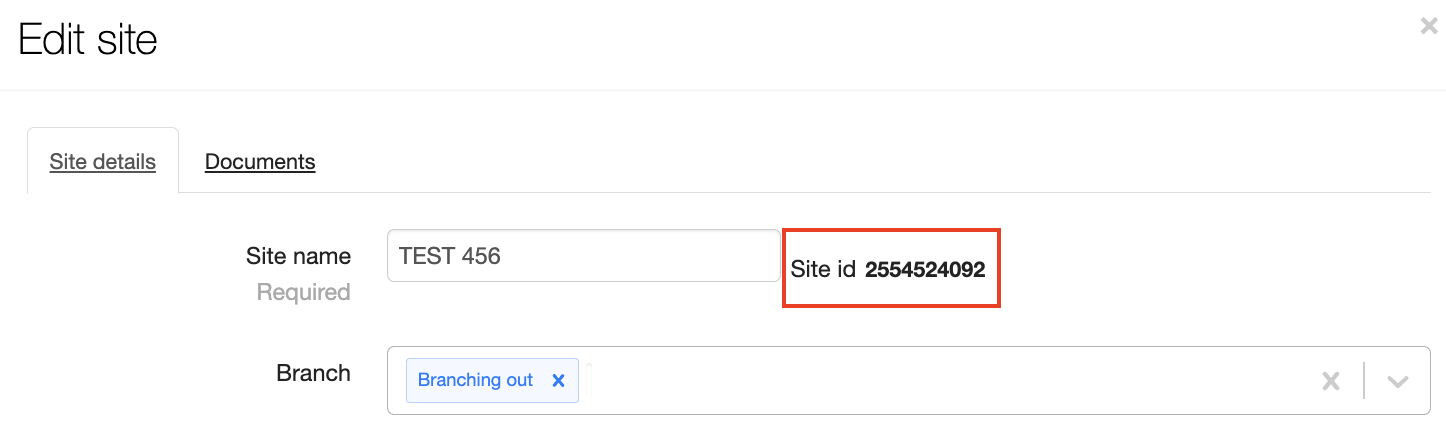
Preferred site ID, Branch IDs, or Template IDs – the data you enter in the Preferred site ID, Branch IDs, or Template IDs fields must be the JoinedUp system-generated ID. Entering the site or branch name will cause a validation error. To locate the Site ID: Navigate to Clients, review the Sites list that displays on the right-hand side of the Clients screen and then click the address for the Site you need, the Edit screen displays and the Site ID is visible to the right of the Site name field.
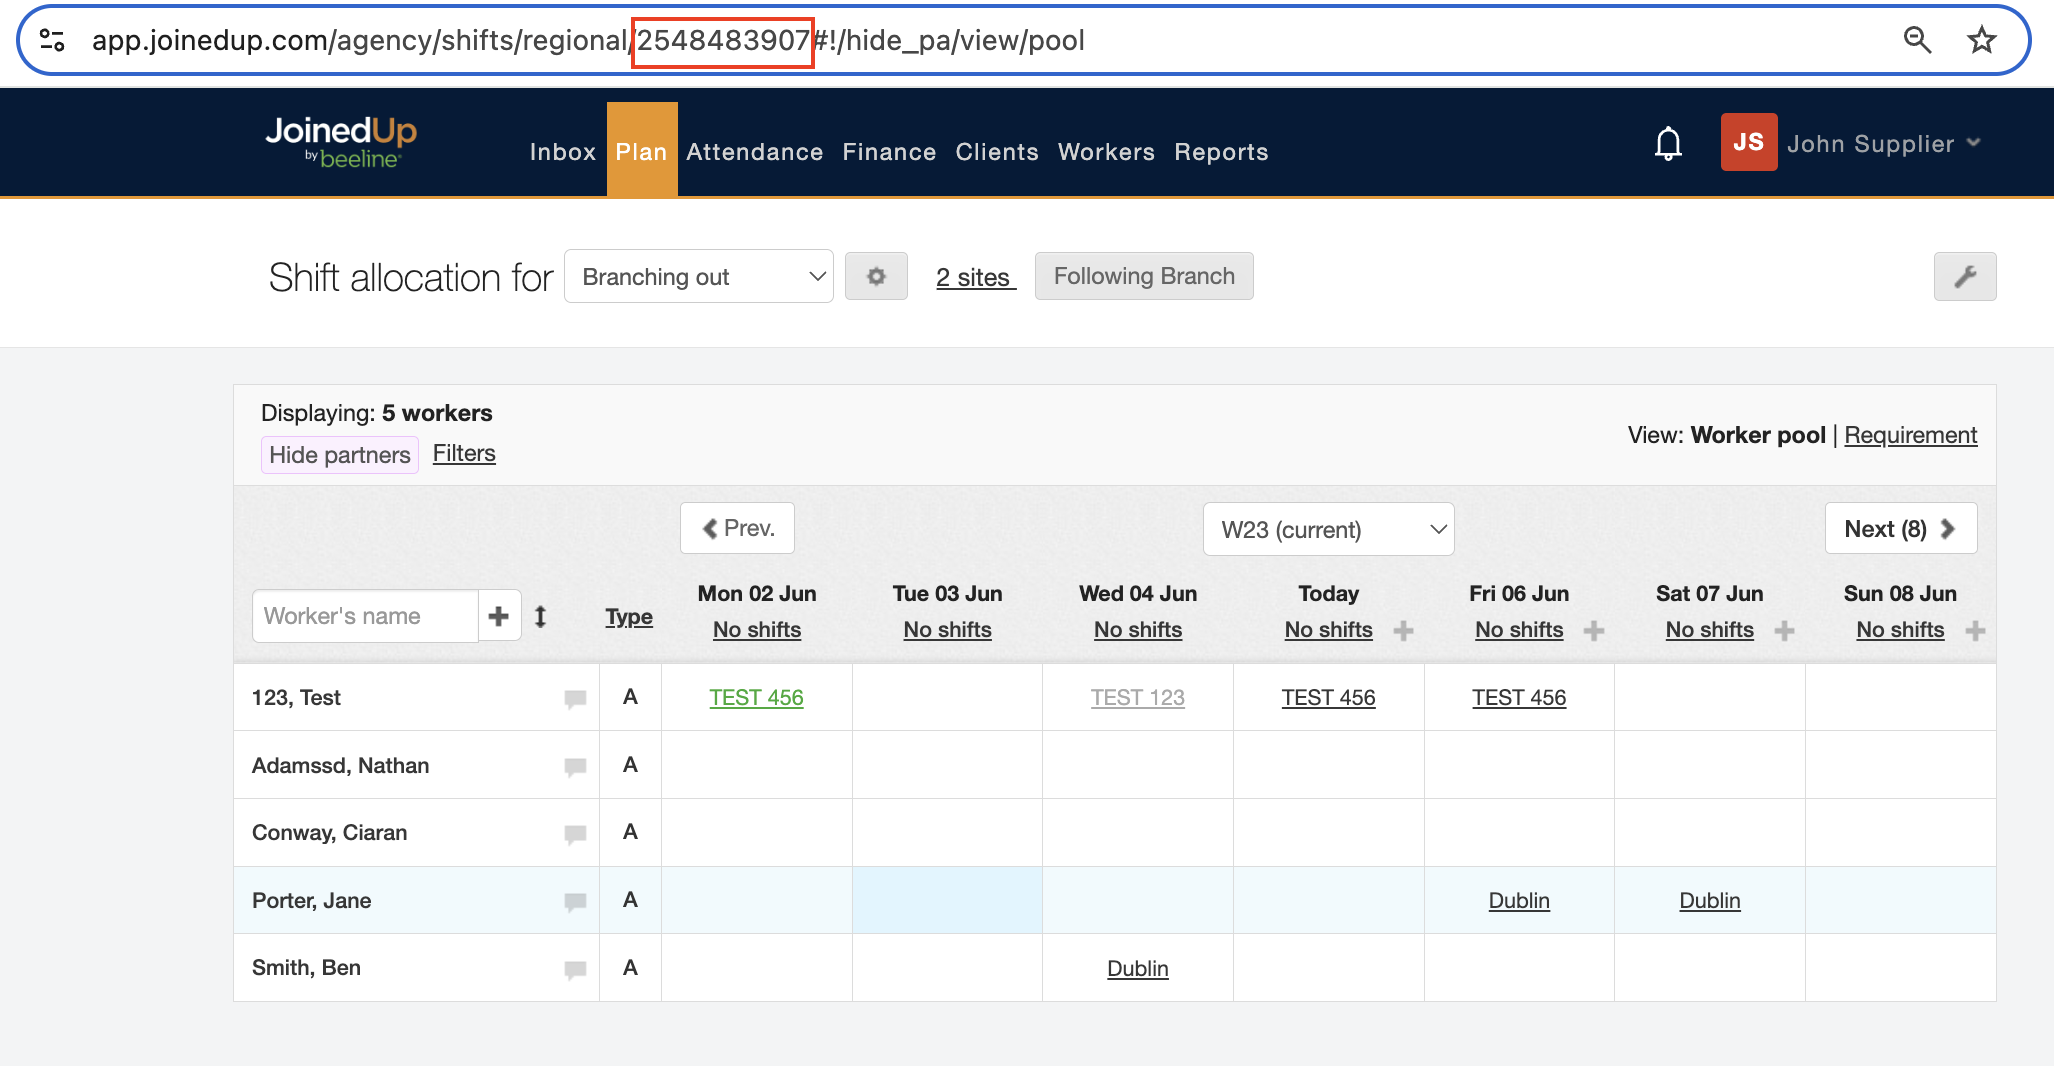
To locate the Branch ID: Navigate to and select the Branch you need in the Shift allocation for [selection] field. Then check the URL bar at the top of your screen to copy the Branch ID from the URL string.
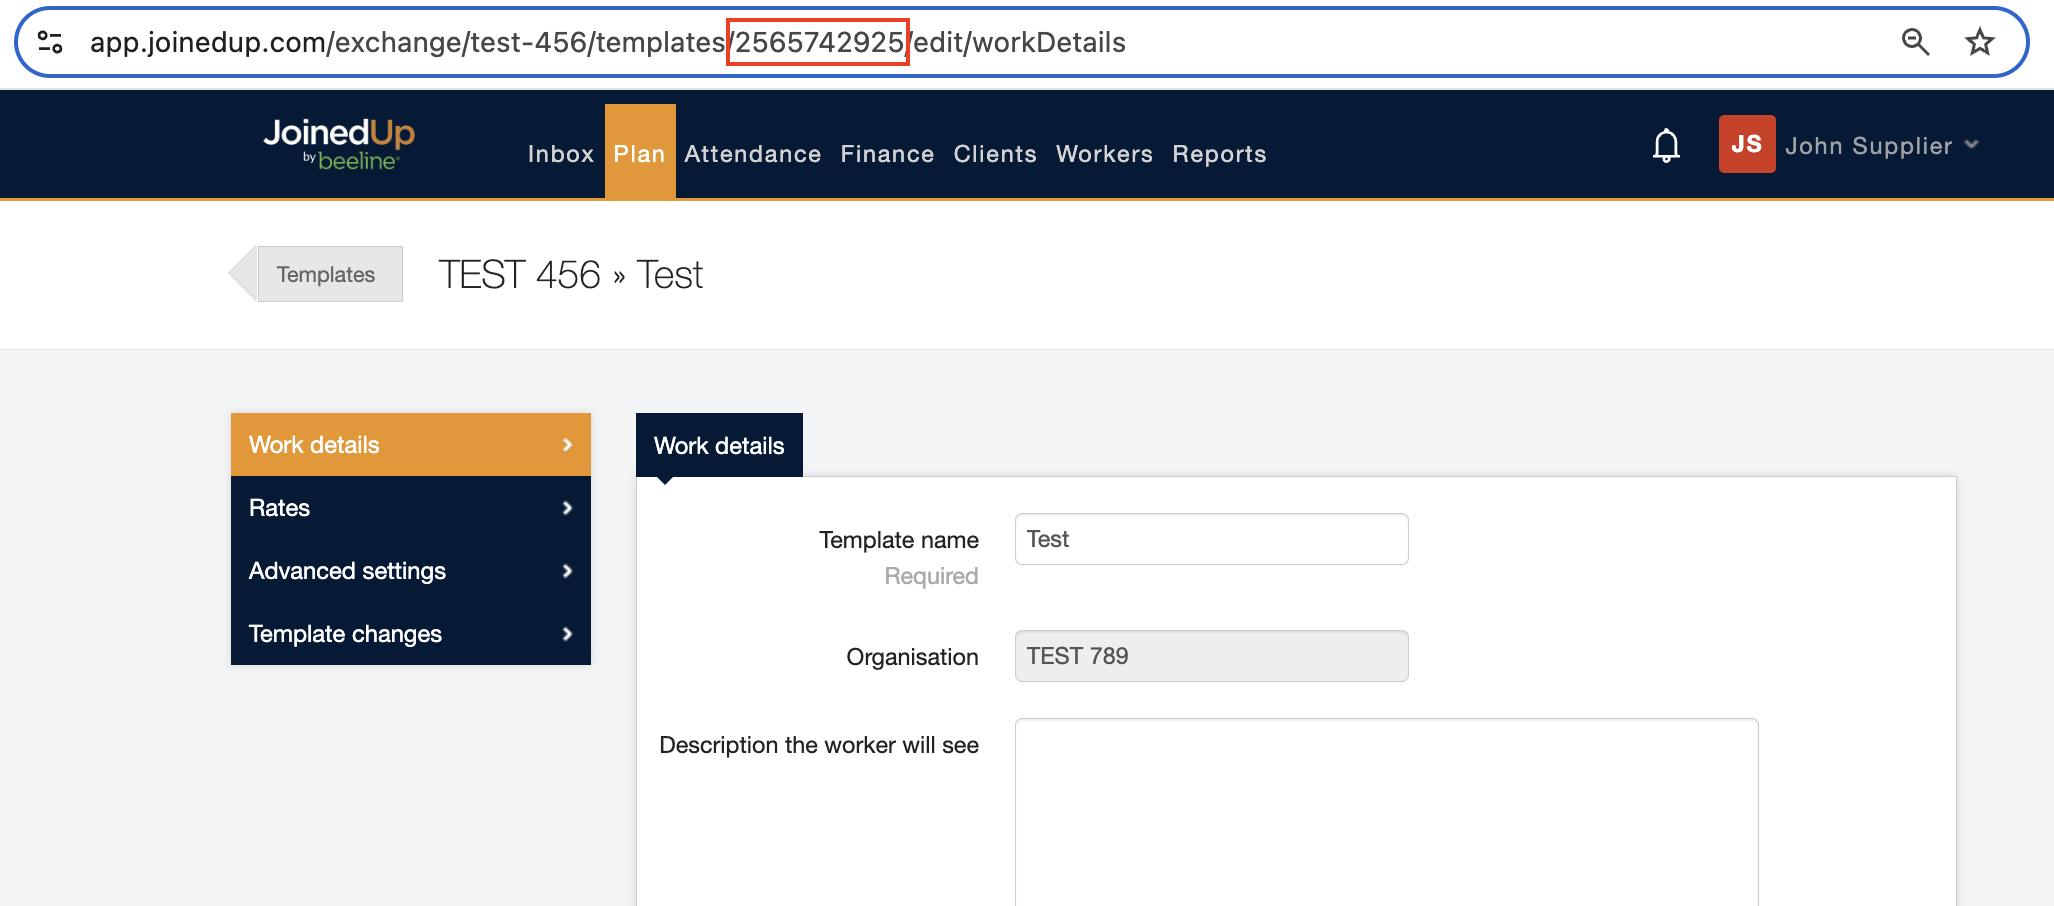
To locate the Template ID: Navigate to Plan > Shift templates and select the shift template you need from the displayed list to open it. Then check the URL bar at the top of your screen to copy the Template ID from the URL string.
-
Skip registration checks until / Skip email confirmation until – your entry must always reflect a date in the future. If you don’t have an exact date for the “skip” then enter 2070 to make it open-ended.
Have other tips that would make data entry easier for uploads? Let us know and we’ll add them to this list!