Shift Templates
Setting up Rates in Shift Templates
Shift templates contain all the rate information about every job required for automated payroll calculations using the Rate Engine.
Navigate to Plan on the Header menu and then select Shift templates. Each site that you will be supplying workers into needs to have a Shift template set up for every job that you will be booking.
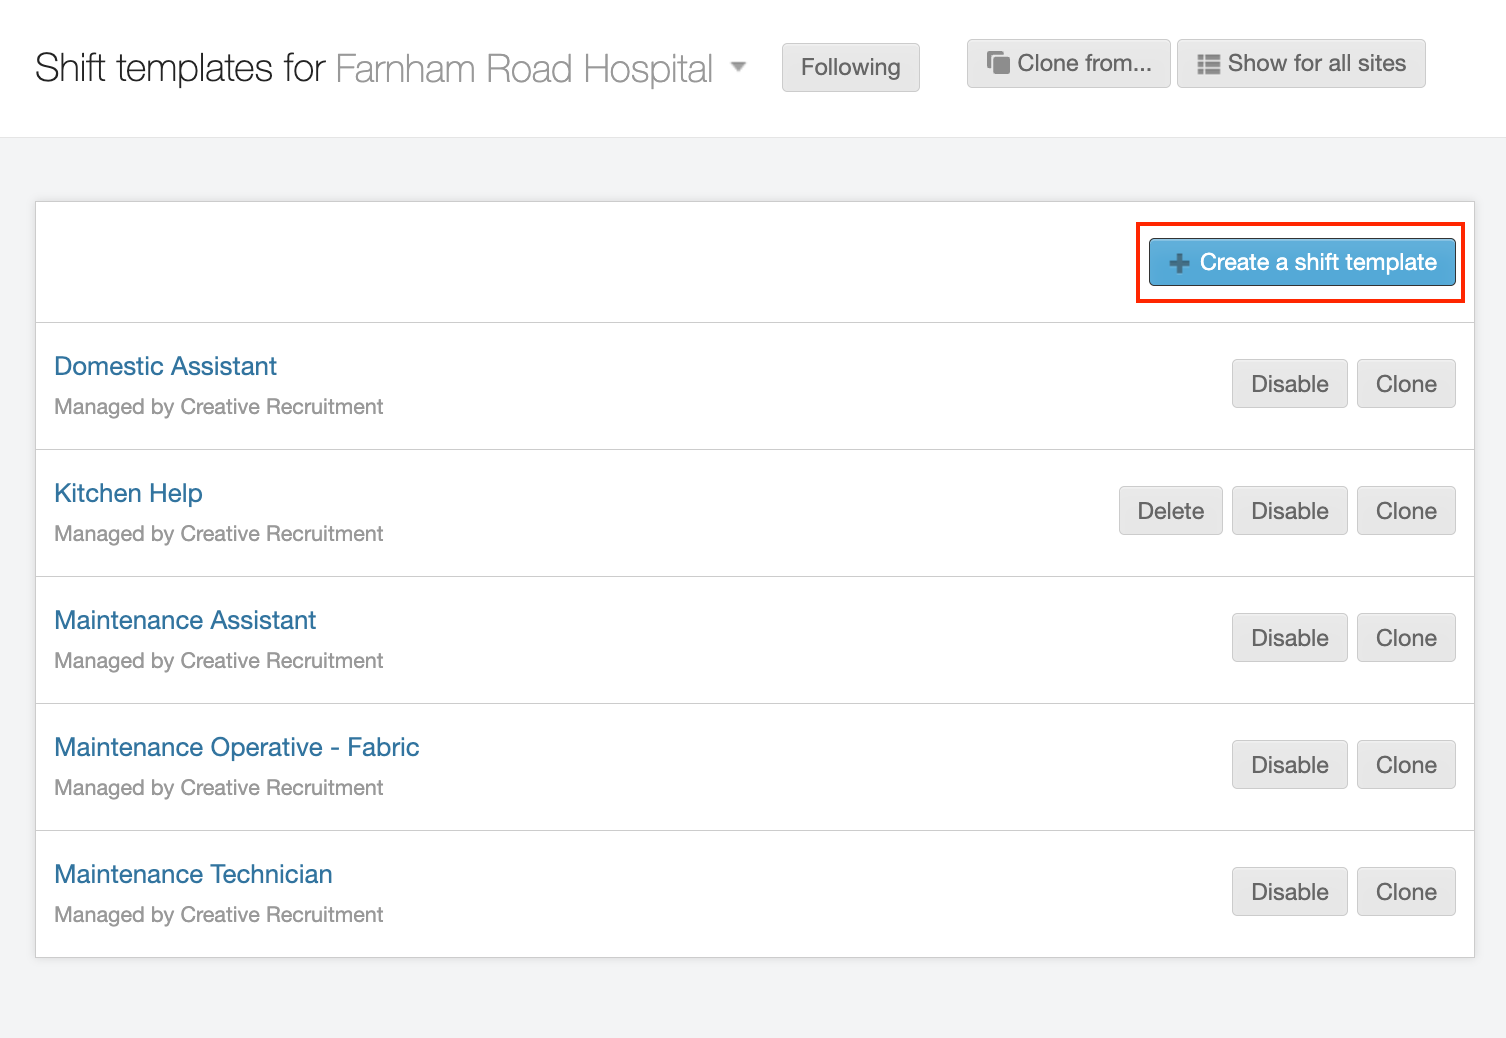
The Shift templates screen shows the templates already set up at the selected site. You can click on each of them to drill down and see or amend the rates.
To create a new Shift template select the + Create a shift template button.
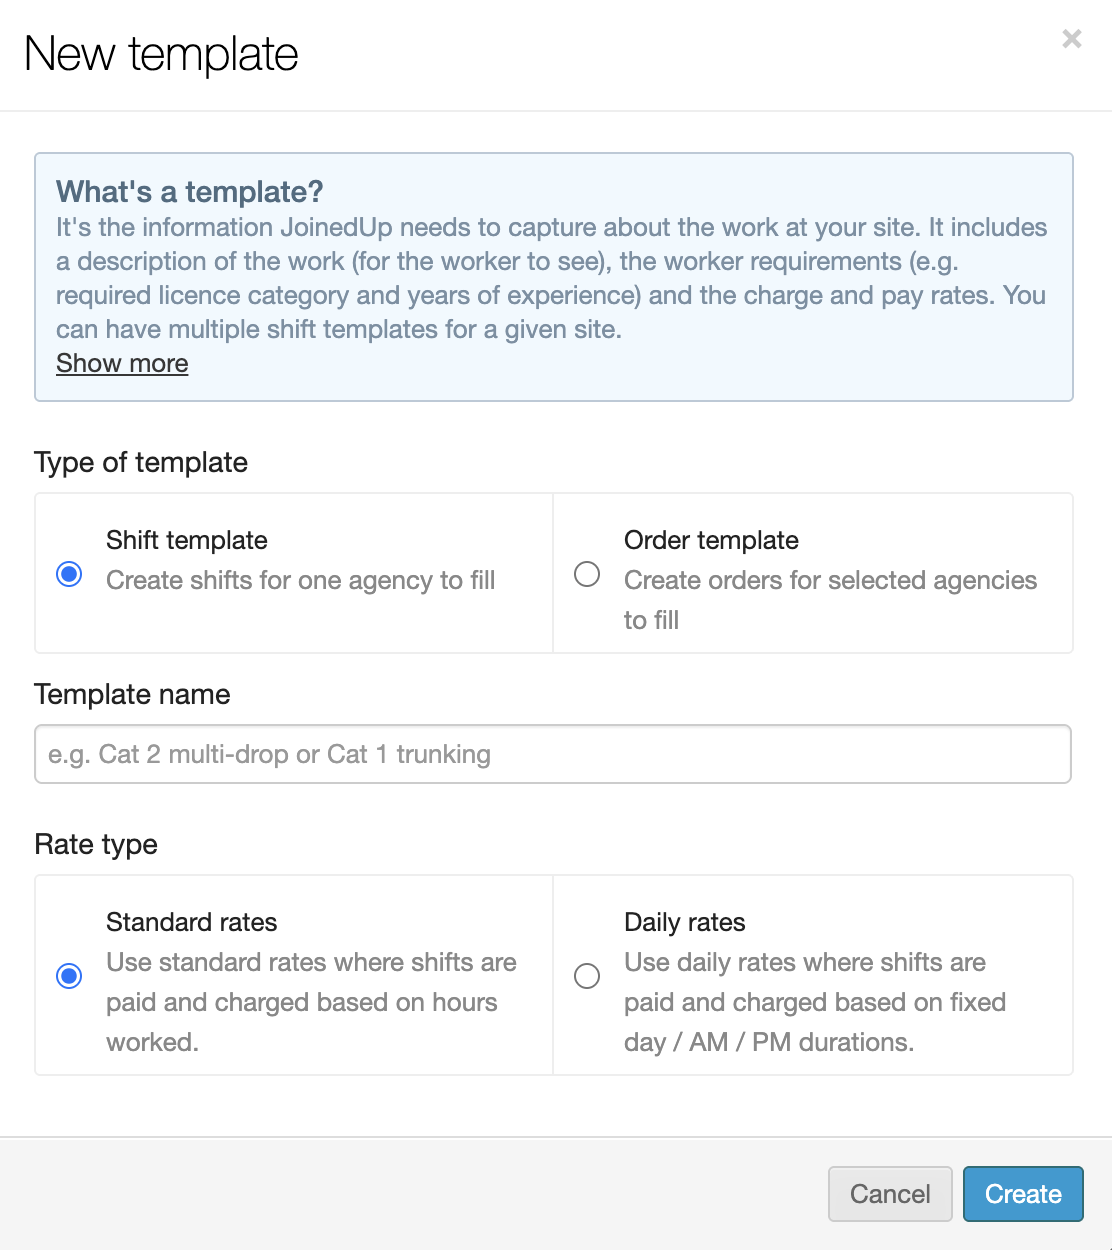
First, give the Shift template a name. These templates are normally named after the jobs to which the rates apply. Type in the name and click Create.
Rate and rate hours
The template is now created but we still need to set up the rates inside the template before we can start making any bookings. For this please navigate to the Rates tab.
-
Worker type – you can have variations of the rates for the same job based on the worker’s employment arrangement such as PAYE workers, workers with their own Ltd. companies, or workers using the services of umbrella companies.
-
Effective from – shows previous versions of the rates used historically and tagged with the week of the year they came into effect. Rates on JoinedUp lock down after they have been used to calculate a shift and cannot be edited. If you need to make a change, please create a new version setting up the week you would like the new rates to take effect and adjust the rates on the new template.
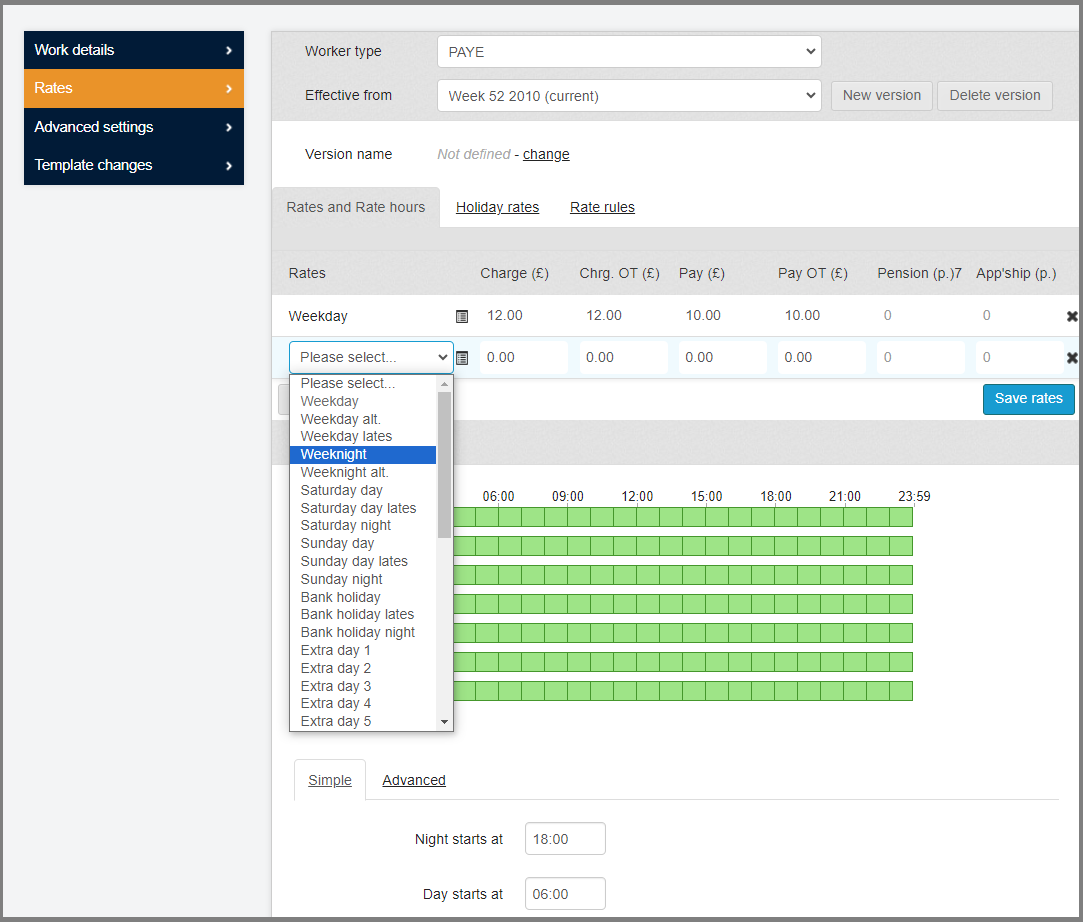
In the Rates example shown below, we need to list out every rate used to calculate this shift for payroll, e.g., a separate rate for Weekday, Weeknight, and Weekend. The example shows a graphic representation of how rates are applied depending on when in the week and when during the day the shift is carried out.
By default, it will show one rate with a £12 Charge that goes to the client and a £10 for the worker. This is a flat rate applicable to all shifts regardless of the time they are carried out.
You can edit these rates by clicking each cell and overwriting the value entered. To add more rates click the Add rate button.
You will need to select one of the tags in the drop-down to describe the rate such as Weeknight and then fill in the hourly rates for Charge and Pay. Please note that the Charge and Pay rates in each line come in couples. There is a base Charge and Pay and a Charge and Pay to be used when the worker is doing overtime.
Once a second rate is added, the graph changes as shown in the example below. The colours indicate the two rates applicable throughout the week where the Weekday rate indicated by the light green colour is to apply to shifts worked between 06:00 and 18:00 and a Weeknight will be used for calculating shifts after 18:00 and before 06:00 the following morning.
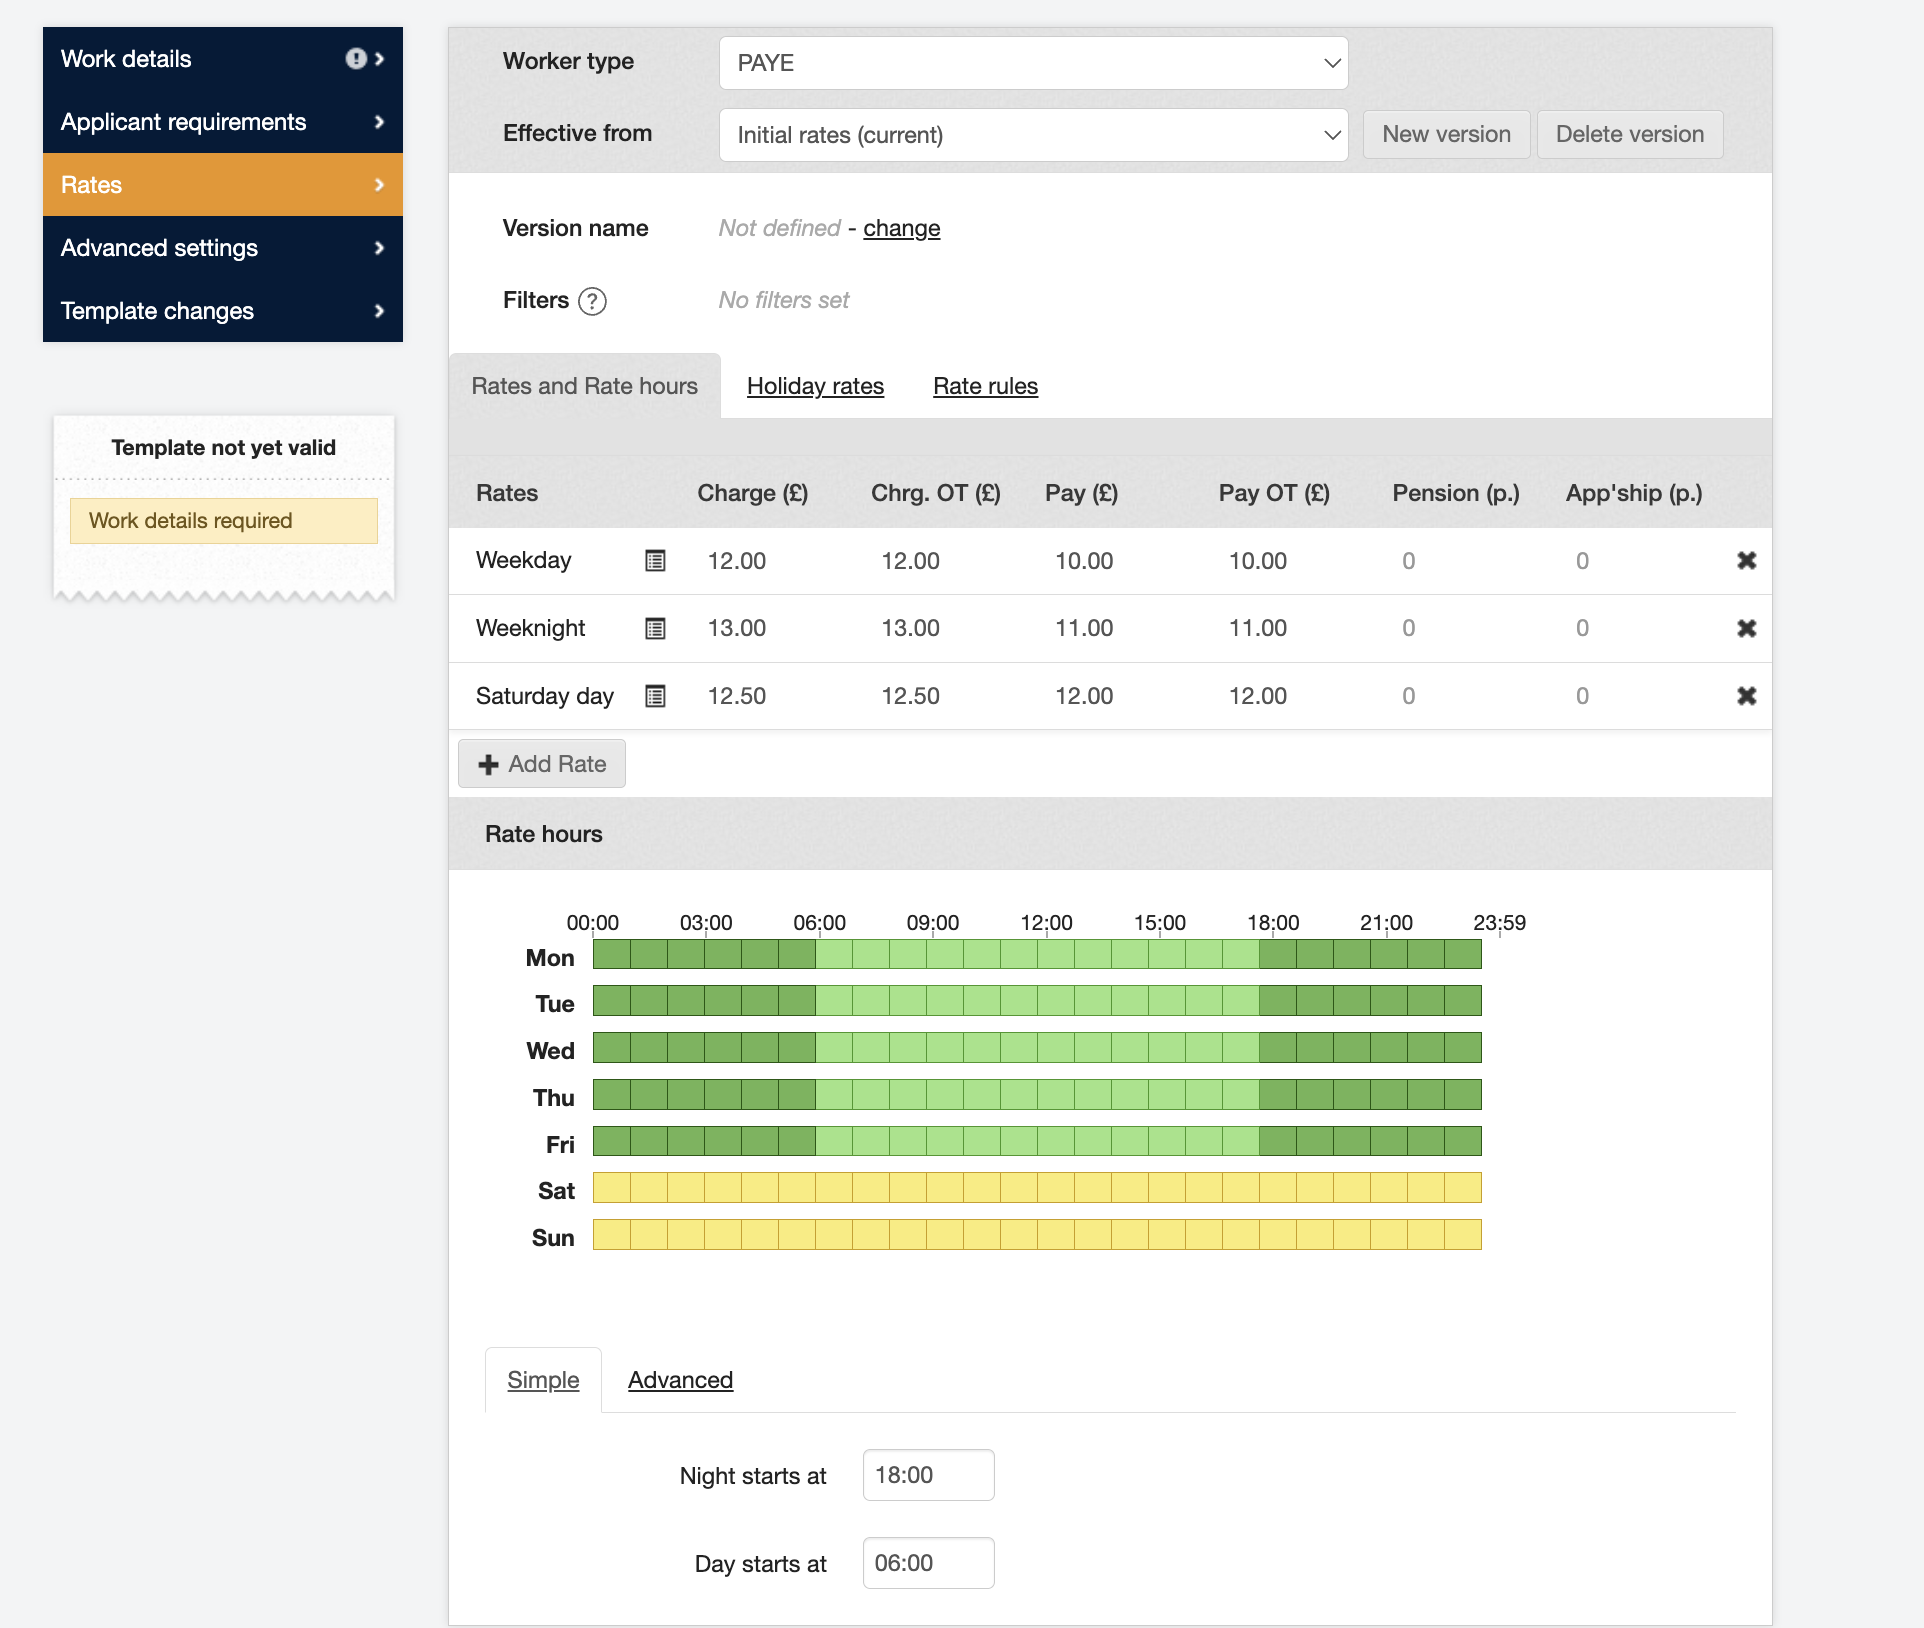
Make sure you add every rate needed to calculate the shifts.
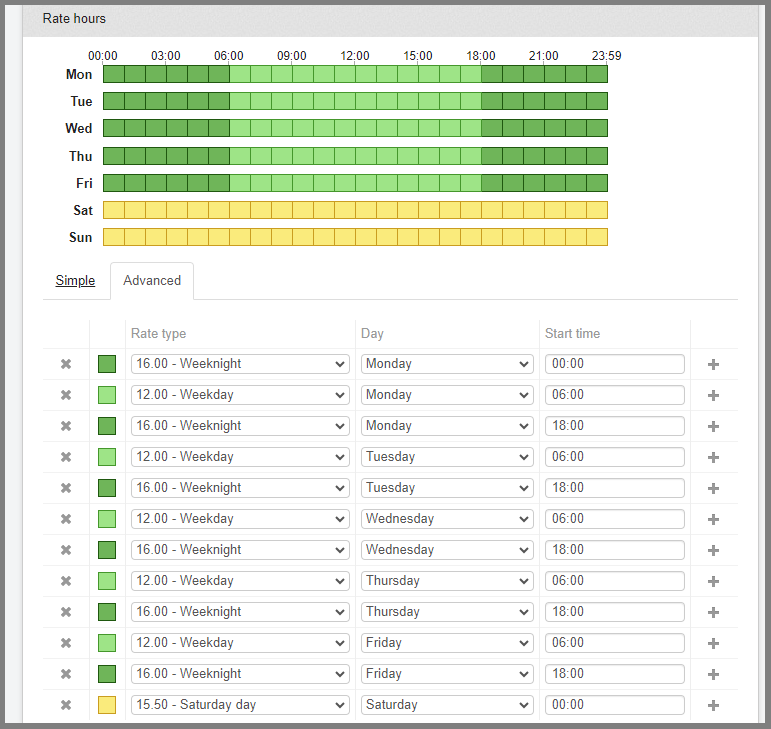
Use the Advanced settings underneath the graph to set up which rate applies at which time of the day and week. The rates are listed chronologically from the start of the week. Our first rate in the week is a Weeknight rate starting on Monday at 00:00. This rate will stay in effect until a new one is added to replace it. The start of one rates means the end of the previous one.
Our Weeknight rate will stay in effect until the Weekday rates start on Monday at 06:00. The Weekday rate until 18:00 when the Weeknight comes back and stays on until Tuesday at 06:00 when the Weekday rate will replace it again.
Holiday Rates
You can also set up exceptions with specific rates to be applied for work during bank holidays. In the next tab you can add bank holidays, define their durations and select the rates to be applied.
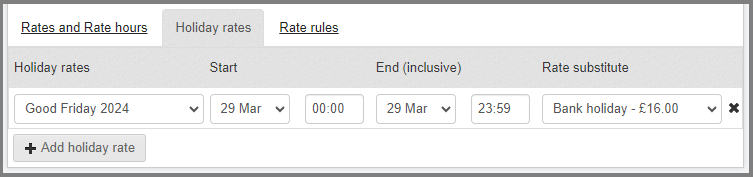
Above we have set up a Bank Holiday rate to apply to all shifts worked on the 29th of March because it is Good Friday. You can set up the bank holiday rates till the end of the year and JoinedUp will automatically apply the special rates for the dates added.
Rate Rules
In the last tab there are a few more rules governing how the rates are to be calculated as well as information about break deductions and overtimes.
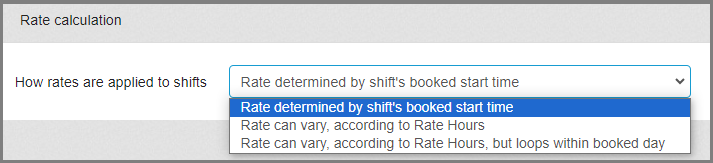
1. How rates are applied to shifts:
-
Rate determined by the booked start time. In a scenario where two or more rates are applicable (e.g., Weekday and Weeknight) with this setting the entire shift will be calculated at the rate the shift started on.
-
Rate can vary, according to Rate Hours. When more than one rate applies the system will apply all of based on how many hours have been worked under each rate during the shift. For example, there is a Weekday rate applicable 06:00-18:00 and a week night after 18:00. The shift runs 14:00-22:00.
With this setting the system will calculate the first four hours under the Weekday rate and the second four under Weeknight.
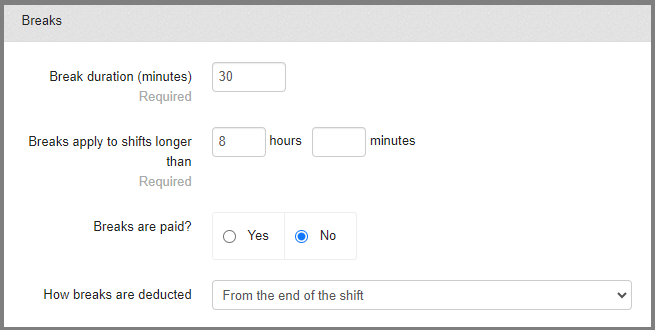
2. Break Duration
Here you will need to define how breaks are applied by saying how many minutes of break does a worker get after how many hours of work.
You also stipulate whether the break is paid or not. If they’re set to Not Paid they will be deducted from the length of the shift leaving you with only the billable hours at the payroll stage.
Lastly, you select how breaks are deducted:
-
From the end of the shift: The number of minutes going towards the break will be deducted from the last hour of the shift.
-
At the prevailing rate at which the break is applied: In the scenario where more than one rate is applicable throughout the shift, then the break will be deducted from the poll of minutes calculated at the rate during which most of the break was taken. For example, there is a Weekday rate applicable 06:00-18:00 and a Weeknight after 18:00. The worker took their break at 17:30 for 45. 30 minutes of the break fell under the Weekday rate and 15 minutes on the Weeknight rate making Weekday the prevailing rate and therefore all 45 minutes will be deducted from the hours calculated under the Weekday rate.
-
At the rate at which the break’s first minute is applied: In a two-rate scenario the break will be deducted from the poll of minutes calculated under the rate which the first minute of the break fell under.
Overtime: you specify how many hours must the shift run before the Overtime rate starts applying.

-
Weekly Overtime: Overtime can also be applied weekly. To do this you need to stipulate the number of hours worked in the week to qualify for overtime. All hours above that hour threshold will be calculated at the higher overtime rate.
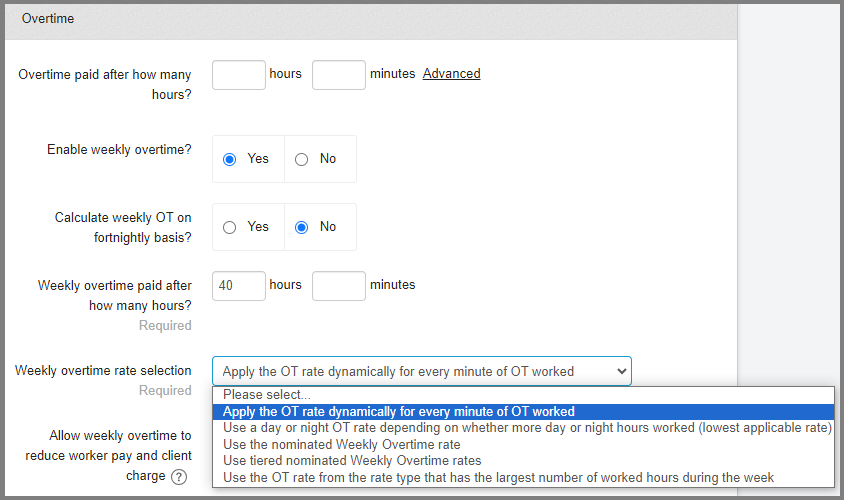
Weekly overtime rate selection:
-
Apply the OT rate dynamically for every minute of OT worked: all minutes after reaching the threshold will be calculated on the higher overtime rate.
-
Use a day or night OT rate depending on whether more day or night hours worked (lowest applicable rate): In a scenario where there is a different OT rate applicable during day and night the system will apply the rate that had more hours worked on it in that week.
-
Use the nominated Weekly Overtime rate: apply the weekly OT preset as a separate rate band in the rates below.
-
Use tiered nominated Weekly Overtime: you can also have tiered weekly overtime rates based on the number of hours worked in the week.
For example:
44h worked qualifies for OT1
48h worked qualifies for OT2
-
Use the OT rate from the rate type that has the largest number of worked hours during the week: In a scenario where multiple overtime rates are applicable for the different times the shifts are worked the system will apply the OT rate connected to the largest number of hours worked in the week.
-
How to apply the weekly overtime rate hours:
-
Replace lowest value hours first.
-
Replace highest value hour first.
-
Replace day or night hours depending on whether more day or night hours worked.
-
-
Allow weekly overtime to reduce worker Pay and client Charge: In a situation where the base rate is higher than the overtime rate, the system will apply the higher rate unless this is switched on and the overtime is applied even if it’s the lower rate.
-
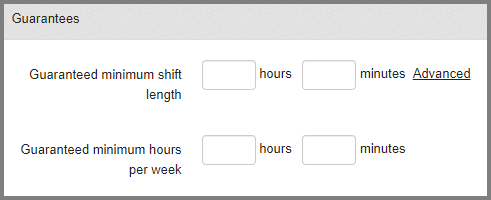
Guaranteed minimum shift length: When a worker is promised to be paid a minimum number of hours regardless of how long their shift ran, it can be set up in the Shift template. Then if the shift is shorter than the minimum the system will automatically top it up to the guaranteed minimum.
Conversely, the guarantee can also be capped with a maximum number of hours the shift won’t go over.
Grant daily guarantee by default. Having set this one to ‘Yes’ will mean that the system will automatically top up the shifts shorter than the minimum guarantee. Otherwise it will need to be manually granted.